


: A Comprehensive Overview")


")


.jpg?w=218&resize=218,150&ssl=1 "UNESCO Zollverein Coal Mine Industrial Complex & Other Things to do in Essen, Germany | My Travelogue")

")


Machine learning (ML) powers industries by enabling smarter automation and data-driven insights. From predictive maintenance in manufacturing to personalized recommendations in e-commerce, ML models drive decision-making across sectors. However, deploying ML at scale introduces challenges beyond traditional software development. It involves managing large datasets, optimizing training workflows, and ensuring models remain accurate over time.
Kubernetes has emerged as the de facto standard for deploying containerized applications, including ML workloads. It automates resource allocation, ensures fault tolerance, and provides a flexible environment for ML. However, it lacks built-in support for experiment tracking, hyperparameter tuning, and model versioning. Kubeflow addresses these gaps, offering a framework to manage ML lifecycles on Kubernetes.
In this blog post, we will explore Kubeflow, how to set it up, and common challenges you may encounter. By the end, you’ll have a Kubeflow deployment on GKE, equipped to handle scalable ML workloads.
Understanding MLOps fundamentals
Machine learning pipelines automate the steps required to build and deploy LLM models. Unlike ad-hoc scripts, ML pipelines ensure consistency, repeatability, and scalability across different ML experiments.
You can imagine an ML pipeline as a manufacturing assembly line. Each stage, including data ingestion, preprocessing, training, evaluation, and deployment, depends on the previous step’s output. Without an optimized pipeline, various inefficiencies, such as data inconsistencies, training failures, and resource bottlenecks, may arise. The complexity intensifies when teams scale ML workloads across distributed environments, requiring seamless integration between computing, storage, and orchestration tools.
Key components of ML pipelines
A typical ML pipeline consists of the following:
- Data ingestion & preprocessing: Collects, cleans, and transforms raw data into a structured format.
- Feature engineering: Extracts relevant features from data to improve model performance.
- Model training: Uses algorithms to learn patterns from training data.
- Evaluation & validation: Assesses model accuracy, bias, and generalization using test datasets.
- Deployment & monitoring: Serves the trained model for inference and monitors its real-world performance.
For a detailed breakdown of MLOps principles, refer to this MLOps guide.
Advantages of using Kubernetes for MLOps pipelines
Kubernetes provides a scalable, portable, and automated environment for ML workflows:
- Scalability: Dynamically adjusts resources for large-scale training jobs and inference workloads
- Portability: Enables ML model deployment across cloud providers or on-prem environments
- Automation: Manages containerized ML applications with minimal human intervention
However, Kubernetes alone does not provide the orchestration tools needed for ML pipelines. In the next section, we’ll introduce Kubeflow, a framework designed to streamline ML model training, deployment, and monitoring on Kubernetes.
Challenges in ML deployment
Deploying ML models in production is not just about writing code. Several operational challenges arise:
- Lack of standardized workflows: Each ML project requires custom scripts, configurations, and dependencies, making it difficult to standardize development and deployment processes.
- Managing dependencies and versioning: ML models depend on multiple software libraries. Ensuring version compatibility across environments is critical to avoid “it works on my machine” issues.
- Data drift and model reproducibility: Over time, input data distributions change (data drift), reducing model accuracy. Without tracking dataset versions, reproducing past results becomes impossible.
Containerized ML pipelines help overcome these challenges by providing reproducible, isolated execution environments.
Benefits of containerized ML workflows
Several advantages of using containers for ML workflows are:
- Isolated execution environments: Each ML pipeline runs with consistent dependencies
- Standardized deployment pipelines: Streamlines model training, testing, and serving
- Seamless cloud integration: Enables cloud-native scaling, integrating with storage, monitoring, and logging tools
- Standardizes deployment: Kubernetes ensures consistent execution
Introducing Kubeflow
Kubernetes is a powerful orchestration tool for containerized workloads, but it lacks built-in support for managing ML workflows. Kubeflow bridges this gap by providing an open-source ML toolkit for Kubernetes that simplifies the deployment, training, and serving of ML models. It automates the deployment, training, and serving of machine learning models while ensuring scalability and reproducibility.
Why Kubeflow?
Multiple tools are available for ML model orchestration, including Amazon SageMaker, MLflow, and Airflow. While these tools serve specific purposes, Kubeflow offers a comprehensive solution that integrates seamlessly with Kubernetes.
Comparing ML Orchestration tools:
- Amazon SageMaker is an AWS-managed service for training, deploying, and managing ML models. It integrates well with AWS but is cloud-specific.
- MLflow focuses on model tracking and experiment management. It supports various ML frameworks but lacks built-in orchestration and serving.
- Apache Airflow is a general-purpose workflow orchestrator. While it can schedule ML tasks, it lacks features like hyperparameter tuning and model tracking.
| Feature | Kubeflow | SageMaker | MLflow | Airflow |
| ML Pipeline Orchestration | End-to-end ML workflows | AWS-managed pipelines | Lacks workflow orchestration | General workflow automation, not ML-specific |
| Model Training | Distributed training for TensorFlow, PyTorch, etc | Managed training with autoscaling | Tracks run but lack orchestration | Can schedule jobs but isn’t ML-optimized |
| Hyperparameter Tuning | Built-in Katib for tuning | AWS-native tuning | Support via Optuna | Requires custom scripts |
| Model Serving | Scalable deployment with KServe | Provides managed endpoints for deployment | Supports serving but lacks scalability | Not designed for deployment |
| Kubernetes Native | Runs on any Kubernetes cluster | Requires AWS infrastructure | Multi-cloud but not Kubernetes-native | Not built for Kubernetes |
| Cloud Provider Agnostic | Works on-prem and multi-cloud | Tied to AWS infrastructure | Supports various clouds | Cross-cloud but not ML-specific |
Kubeflow’s Kubernetes-native approach makes it ideal for teams needing flexibility, scalability, and full ML lifecycle management. Unlike SageMaker, it isn’t tied to one cloud. Compared to MLflow, it offers more than just model tracking. While Airflow is great for workflow automation, it lacks ML-specific tools like experiment tracking and tuning.
Setting up Kubeflow on GKE
Deploying Kubeflow on GKE involves multiple configuration steps, including cluster provisioning, role-based access control (RBAC), and networking settings. In this section, we’ll set up a GKE cluster, configure authentication, and deploy Kubeflow using manifests. Later, we’ll build and deploy an Iris classification pipeline.
Prerequisites & environment setup
To ensure a successful Kubeflow deployment, set up:
- Kubernetes Cluster (v1.23+) – Running on GKE
- IAM roles & Workload Identity – Required for authentication
- CLI tools installed – kubectl, kustomize, and gcloud
- Install Python to compile the ML pipeline
Workload Identity setup is crucial for authentication; we’ll discuss issues we faced in the next section.
Step 1: Configuring the GCP project
Start by selecting or creating a GCP project and enabling billing:
$ gcloud projects create  --set-as-default
$ gcloud config set project
Enable authentication for the project:
Step 2: Enabling required APIs
Kubeflow requires multiple GCP APIs to manage Kubernetes clusters, authentication, and machine learning services. Enable them with the following command:
gcloud services enable \
  serviceusage.googleapis.com \  # Service usage tracking
  compute.googleapis.com \       # Compute Engine API
  container.googleapis.com \     # Kubernetes cluster management
  iam.googleapis.com \           # Identity & Access Management
  servicemanagement.googleapis.com \ # Service Management API
  cloudresourcemanager.googleapis.com \ # Resource management
  ml.googleapis.com \            # AI/ML services
  iap.googleapis.com \           # Secure IAP access
  sqladmin.googleapis.com \      # Cloud SQL management
  meshconfig.googleapis.com \    # Istio service mesh
  servicecontrol.googleapis.com  # API control
Step 3: Creating the GKE cluster
Now, create the GKE cluster optimized for machine learning workloads:
gcloud container clusters create "kubeflow-cluster" \
  --zone "" \
  --cluster-version "" \
  --machine-type "n1-standard-8" \
  --disk-size "100" \
  --num-nodes "3" \
  --enable-ip-alias \
  --scopes cloud-platform \
  --metadata disable-legacy-endpoints=true
Once the cluster is created, verify its status:
$ gcloud container clusters list
NAME: kubeflow-cluster
LOCATION: us-central1-c
MASTER_VERSION: 1.30.9-gke.1009000
MASTER_IP: 104.154.58.81
MACHINE_TYPE: n1-standard-8
NODE_VERSION: 1.30.9-gke.1009000
NUM_NODES: 3
STATUS: RUNNING
Step 4: Configuring Workload Identity for authentication
Kubeflow components require proper IAM roles for accessing GCP resources. To configure Workload Identity, follow these steps:
-
Create a Google Service Account (GSA):
gcloud iam service-accounts create kubeflow-admin --display-name "Kubeflow Admin" -
Bind IAM Roles:
gcloud projects add-iam-policy-binding\ --member="serviceAccount:kubeflow-admin@ .iam.gserviceaccount.com" \ --role=roles/storage.admin -
Link Kubernetes Service Account (KSA) to GSA:
kubectl annotate serviceaccount default \
iam.gke.io/gcp-service-account=kubeflow-admin@.iam.gserviceaccount.com
This ensures that Kubeflow services can authenticate and interact with GCP securely.
Step 5: Deploying Kubeflow using manifests
Kubeflow offers multiple installation methods, including Makefiles and management clusters. In this guide, we will use manifests for a streamlined deployment. For other installation options, refer to the Kubeflow installation guide.
-
Clone the Kubeflow Manifests Repository
$ git clone https://github.com/kubeflow/manifests.git $ cd manifests -
Deploy Kubeflow components
while ! kustomize build example | kubectl apply -f -; do echo "Retrying..."; sleep 20; doneThe installation process is recursive and will keep retrying until all components are successfully applied. This may take approximately 10–20 minutes, depending on cluster size and network conditions.
-
Verify Deployment Status
Check if all components are running in the kubeflow namespace:
$ kubectl get pods -n kubeflow
NAME                                                     READY   STATUS    RESTARTS      AGE
admission-webhook-deployment-5df559fc94-ndxkl            1/1     Running   0             12m
cache-server-554dd7f7c4-vtkj6                            2/2     Running   0             12m
centraldashboard-9ddb69977-bk478                         2/2     Running   0             12m
jupyter-web-app-deployment-8f4f7d67-s72qd                2/2     Running   0             12m
katib-controller-754877f9f-k5n45                         1/1     Running   0             11m
katib-db-manager-64d9c694dd-ql42w                        1/1     Running   0             11m
katib-mysql-74f9795f8b-kqnzg                             1/1     Running   0             11m
katib-ui-858f447bfb-nrdss                                2/2     Running   0             11m
kserve-controller-manager-6c597f4669-4722m               2/2     Running   0             11m
kserve-models-web-app-5d7d5857df-k6fnk                   2/2     Running   0             11m
kubeflow-pipelines-profile-controller-7795c68cfd-gs656   1/1     Running   0             11m
metacontroller-0                                         1/1     Running   0             11m
metadata-envoy-deployment-5c5f76944d-krgv8               1/1     Running   0             11m
metadata-grpc-deployment-68d6f447cc-6g7f8                2/2     Running   4 (10m ago)   11m
metadata-writer-75d8554df5-tnlzc                         2/2     Running   0             11m
minio-59b68688b5-jzmmp                                   2/2     Running   0             11m
ml-pipeline-d9cff648d-w2b5v                              2/2     Running   0             11m
ml-pipeline-persistenceagent-57d55dc64b-fzl2d            2/2     Running   0             11m
ml-pipeline-scheduledworkflow-6768fb456d-f5f2k           2/2     Running   0             11m
ml-pipeline-ui-57cf97d685-2fbb5                          2/2     Running   0             11m
ml-pipeline-viewer-crd-59c477457c-6zdf5                  2/2     Running   1 (11m ago)   11m
ml-pipeline-visualizationserver-774f799b86-z9b5l         2/2     Running   0             11m
mysql-5f8cbd6df7-hc6cn                                   2/2     Running   0             11m
notebook-controller-deployment-7cdd76cbb5-2jcxj          2/2     Running   1 (11m ago)   11m
profiles-deployment-54d548c6c5-twlwh                     3/3     Running   1 (11m ago)   11m
pvcviewer-controller-manager-7b4485d757-8t5rh            3/3     Running   0             11m
tensorboard-controller-deployment-7d4d74dc6b-qjvdd       3/3     Running   2 (10m ago)   11m
tensorboards-web-app-deployment-795f494bc5-qgs44         2/2     Running   0             11m
training-operator-7dc56b6448-vbq74                       1/1     Running   0             11m
volumes-web-app-deployment-9d468585f-x2qtn               2/2     Running   0             11m
workflow-controller-846d5fb8f4-tc4zd                     2/2     Running   1 (11m ago)   11m
Kubeflow installation deploys multiple components, including Istio for service mesh, MinIO for artifact storage, and various operators for managing ML workflows. These components work together to orchestrate and manage machine learning pipelines efficiently.
If any pods are stuck in Pending or CrashLoopBackOff, refer to the troubleshooting section.
Step 6: Exposing the Kubeflow UI
By default, the Kubeflow UI is not accessible externally. To expose it, modify the Istio Ingress Gateway:
kubectl edit svc istio-ingressgateway -n istio-system
apiVersion: v1
kind: Service
metadata:
  name: istio-ingressgateway
  namespace: istio-system
  labels:
    app: istio-ingressgateway
    istio: ingressgateway
.
.
.
spec:
  type: LoadBalancer  # Changed from ClusterIP to LoadBalancer
  selector:
    app: istio-ingressgateway
    istio: ingressgateway
  ports:
    - name: status-port
      port: 15021
      targetPort: 15021
      protocol: TCP
    - name: http2
      port: 80
      targetPort: 8080
      protocol: TCP
    - name: https
      port: 443
      targetPort: 8443
      protocol: TCP
    - name: tcp
      port: 31400
      targetPort: 31400
      protocol: TCP
    - name: tls
      port: 15443
      targetPort: 15443
      protocol: TCP
.
.
.
  status:
    - loadBalancer: []
Change ClusterIP to LoadBalancer, then apply the changes.
Check the external IP assigned to the gateway:
$ kubectl get svc -n istio-system
NAME                    TYPE           CLUSTER-IP       EXTERNAL-IP   PORT(S)                                      AGE
cluster-local-gateway   ClusterIP      34.118.227.156           15020/TCP,80/TCP                             14h
istiod                  ClusterIP      34.118.230.108           15010/TCP,15012/TCP,443/TCP,15014/TCP        14h
knative-local-gateway   ClusterIP      34.118.227.250           80/TCP                                       14h
istio-ingressgateway    LoadBalancer   34.118.227.149   34.173.135.187   15021:31703/TCP,80:32455/TCP,443:31556/TCP   14h
Once an external IP is available, access Kubeflow by opening the following URL in your browser:
http://

Use the default credentials to log in. The credentials are:
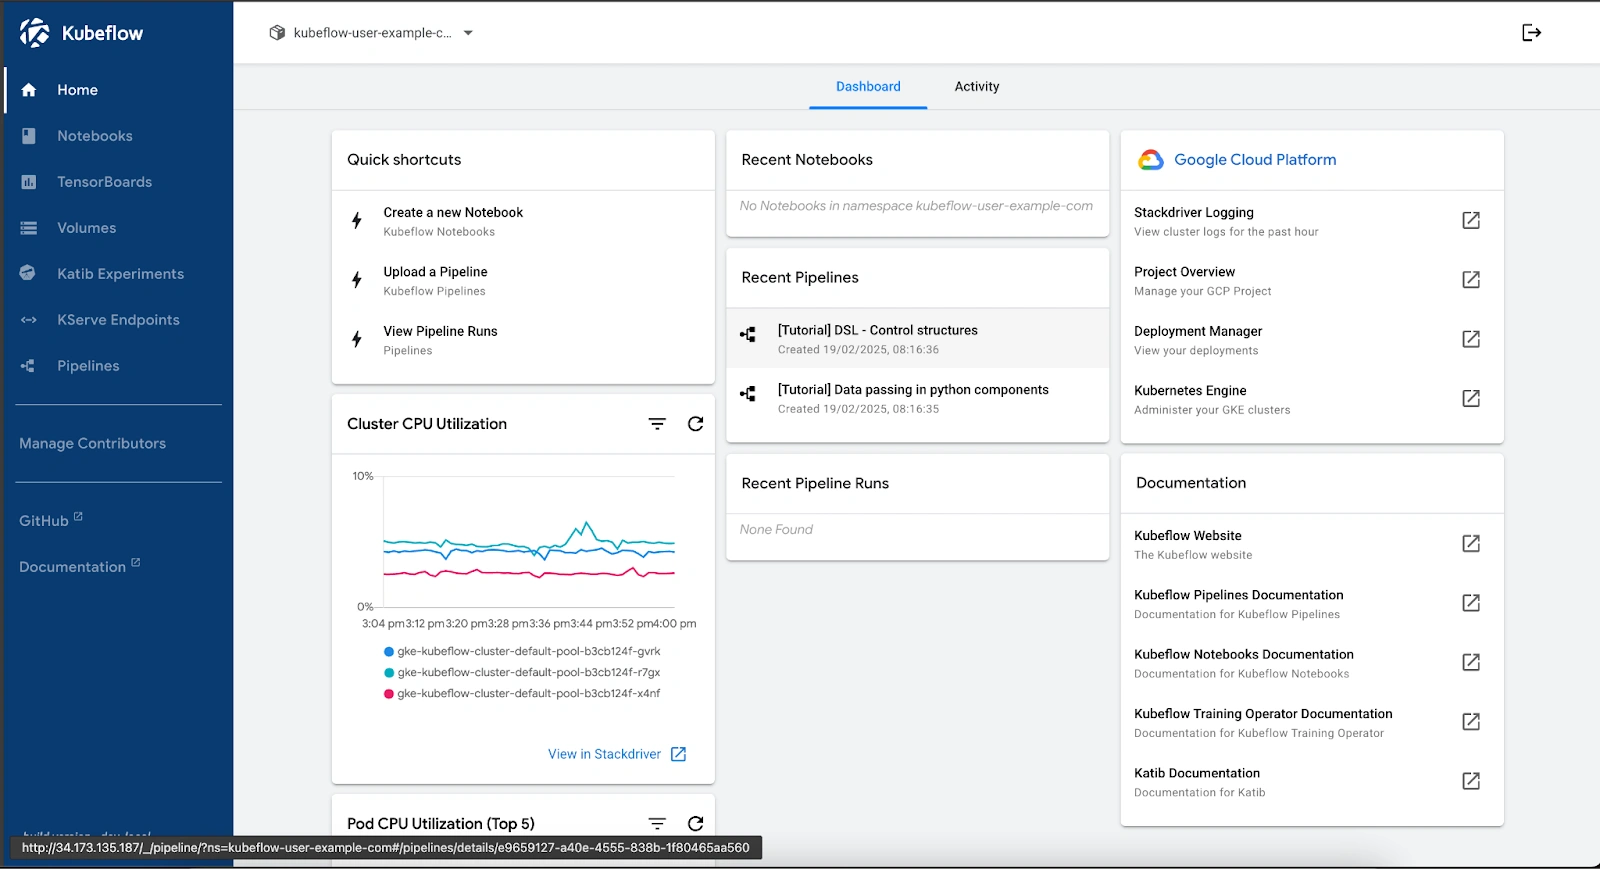
The Kubeflow dashboard provides an overview of active workloads, recent pipelines, and system resource utilization. Users can create notebooks, manage pipelines, and monitor CPU usage. It also integrates with Google Cloud services, allowing access to logs, deployment status, and cluster management tools.
At this stage, Kubeflow should be fully deployed. Next, we’ll explore common setup challenges, verification steps, and running an AI pipeline.
Common setup challenges & solutions
Deploying Kubeflow on GKE isn’t always straightforward. While official documentation provides general guidance, real-world deployments often run into challenges related to authentication, resource management, and component failures. In this section, we’ll cover the key issues we encountered and how to resolve them effectively.
Authentication and permission issues
Kubeflow uses GCP IAM roles, Kubernetes service accounts, and Workload Identity to interact with cloud services. Misconfigurations in any of these can lead to authentication failures, causing pods to crash or preventing access to essential GCP resources.
Workload Identity Misconfigurations
Kubeflow relies on Workload Identity to grant permissions to its components. Any misconfiguration can prevent them from authenticating properly.
Issue: Kubeflow components failed to authenticate with GCP services due to incorrect Workload Identity configuration.
Resolution:
Service Account Permission Errors
Kubeflow components require specific IAM roles to interact with cloud services for pipeline execution and storage access.
Issue: Kubeflow components failed to function due to missing IAM permissions.
Resolution:
Resource Constraints & Cluster Configuration
A well-configured cluster ensures smooth deployment and execution of ML workloads. Misconfigured CPU, memory, or storage quotas can cause pods to remain stuck in a Pending state or fail to start.
Insufficient CPU Quota
GKE enforces quota limits on CPU allocation, restricting the number of available resources for machine learning workloads.
Issue: ERROR: (gcloud.container.clusters.create) ResponseError: code=403, message=Quota exceeded
Resolution:
-
Checked quota limits before deployment:
gcloud compute regions describe--format="table(quotas.metric,quotas.limit)" -
Increased quota where necessary via IAM & Admin > Quotas in the Google Cloud Console.
If a pod is stuck in Pending, describe it using:
kubectl describe pod-n kubeflow
Cluster Configuration for Multi-Tool Support
Running multiple tools on the same Kubernetes cluster requires careful resource planning. Different workloads may have conflicting requirements, leading to compatibility issues.
Issue: Running multiple tools with different configurations on the same cluster required conflicting cluster configurations, delaying setup.
Resolution:
- Configure separate node pools to isolate different workloads.
- Apply taints and tolerations to ensure proper workload scheduling.
- Allocate high-memory and more CPUs instances for ML workloads, while lightweight nodes are used for auxiliary services.
Installation and deployment issues
Kubeflow provides multiple installation methods, including Makefiles and manifests. Choosing the right approach is crucial for maintaining flexibility and control over configurations.
Kubeflow CRD Creation Failure (Metadata Size Exceeded Limit)
Large metadata entries in CustomResourceDefinitions (CRDs) can exceed Kubernetes limits of 256 KB on CRD. If a CRD exceeds this limit, kubectl apply fails with an error stating that the metadata size is too large.
Issue:
- Applying CustomResourceDefinitions (CRDs) failed due to metadata exceeding 262144 bytes.
-
The error message typically appears as:
Error: customresourcedefinition.apiextensions.k8s.io “xxxx” is invalid: metadata.annotations: Too long: must have at most 262144 bytes
Resolution:
-
Modify the CRD YAML manually:
$ kubectl get crd-o yaml > crd_backup.yaml $ vi crd_backup.yaml -
Remove unnecessary annotations which often include Helm annotations, last applied configuration, and debugging annotation before being applied to the cluster.
kubectl apply -f crd_backup.yaml
Scaling and resource optimization
Scaling operations in GKE can be impacted by various constraints, including Pod Disruption Budgets (PDBs) and GCP-specific restrictions.
Scaling Down Nodes Stuck
Pod Disruption Budgets (PDBs) define minimum available pod counts, restricting node scaling.
Issue: Pod Disruption Budgets (PDBs) prevented node scaling operations, causing cluster resources to remain over-allocated.
Resolution:
Deleting GKE cluster managed by config controller
Clusters created through Anthos Config Controller cannot be deleted using standard GKE commands due to policy enforcement.
Issue: Standard deletion command gcloud container clusters delete failed due: “Direct GKE operations are disallowed for clusters managed by Config Controller.”
Resolution:
-
Identify if Anthos Config Controller is managing the cluster:
gcloud anthos config controller list --location -
Use the Google Config Controller API to delete the cluster instead of the standard deletion command:
gcloud anthos config controller delete--region
Version compatibility problems
Different versions of Kubeflow, Kubernetes, and GCP services may not always be compatible, leading to unexpected failures. Ensuring version compatibility before deployment is critical to avoiding unnecessary debugging later.
Kubernetes Version Mismatches
Newer Kubernetes versions often introduce API changes, causing older Kubeflow components to fail.
Issue: Incompatible older Kubeflow versions with newer GKE versions.
Resolution:
To verify compatibility before deployment, check Kubeflow release notes.
Component Failures Due to Outdated Manifests
Kubeflow manifests may contain deprecated API versions, causing failures in Kubernetes 1.23+.
Issue: Default manifests failed due to deprecated API references.
Resolution: Manually updated outdated APIs in Kubeflow manifests before applying them.
Debugging techniques and log analysis
Troubleshooting Kubeflow deployments often requires inspecting logs across multiple services, including Kubernetes, Istio, and Kubeflow components.
Techniques for Debugging Issues
-
Check Deployment Status:
kubectl get pods -n kubeflow -
Inspect Logs of Failed Pods:
-
Describe Pods for More Information:
kubectl describe pod-n kubeflow -
Check Cluster Events for Failures:
kubectl get events -n kubeflow -
Verify Role Bindings:
kubectl get rolebinding -n kubeflow
At this stage, Kubeflow should be deployed and configured correctly. Next, we’ll build an AI pipeline, run experiments, and validate the pipeline’s execution.
AI pipeline demo: Deploying an ML workflow
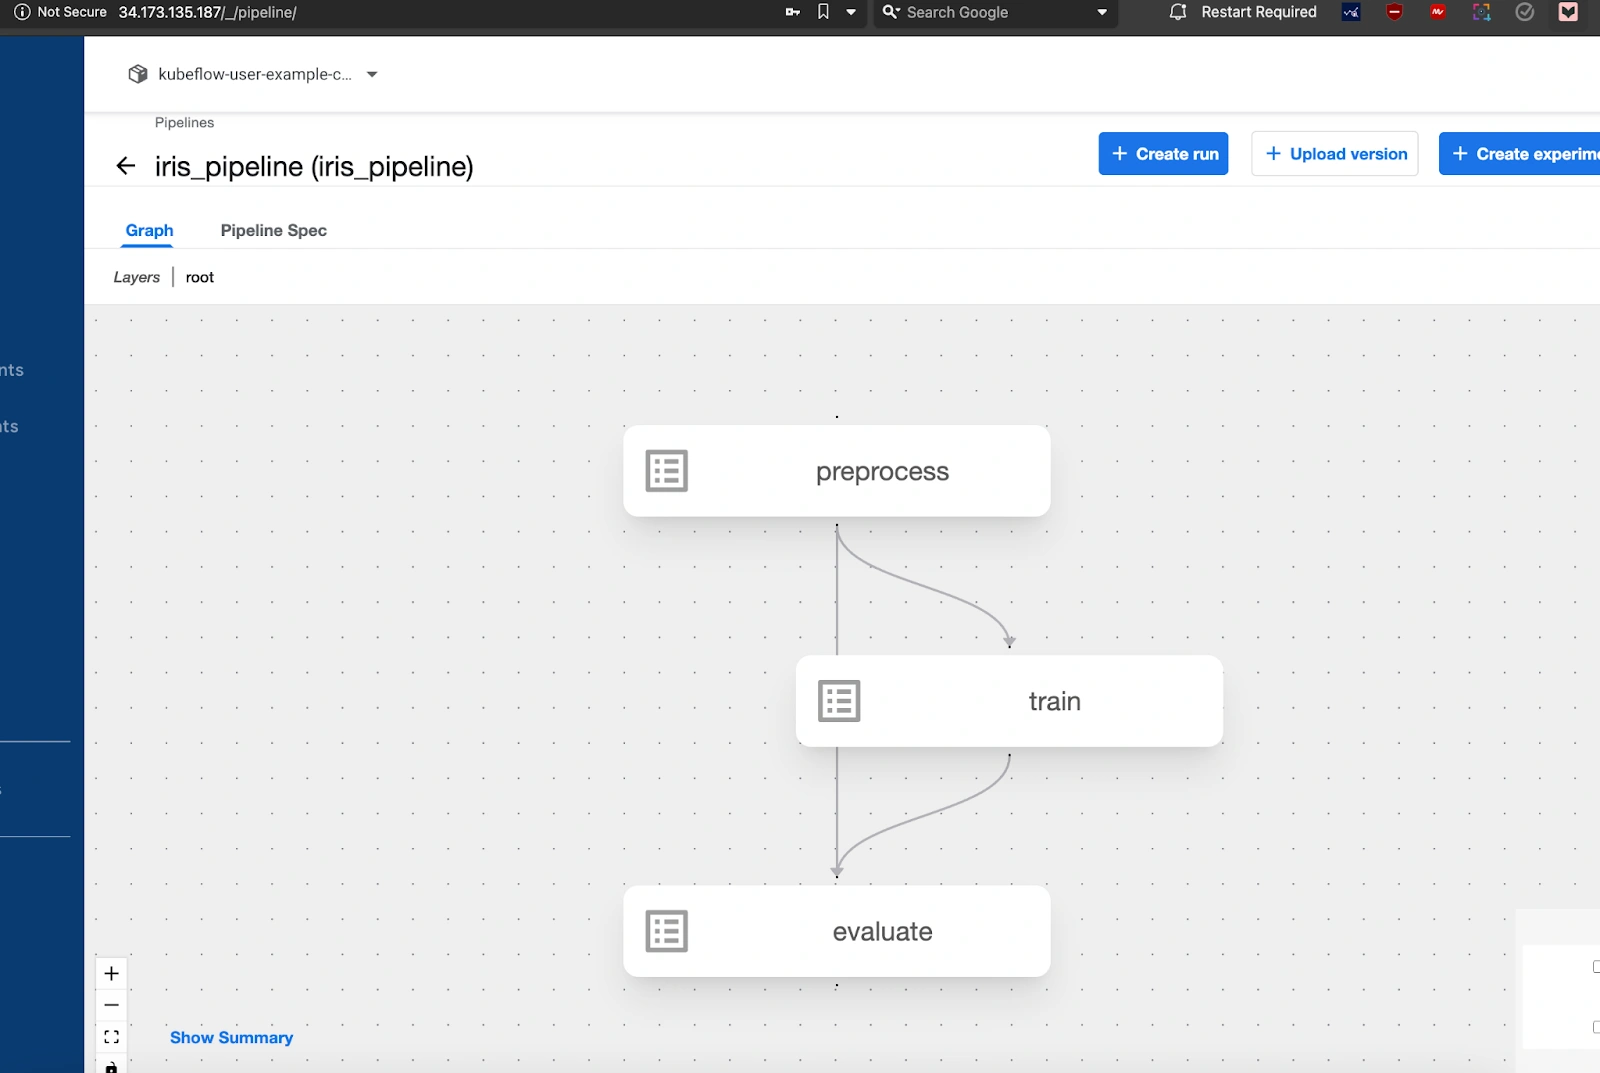
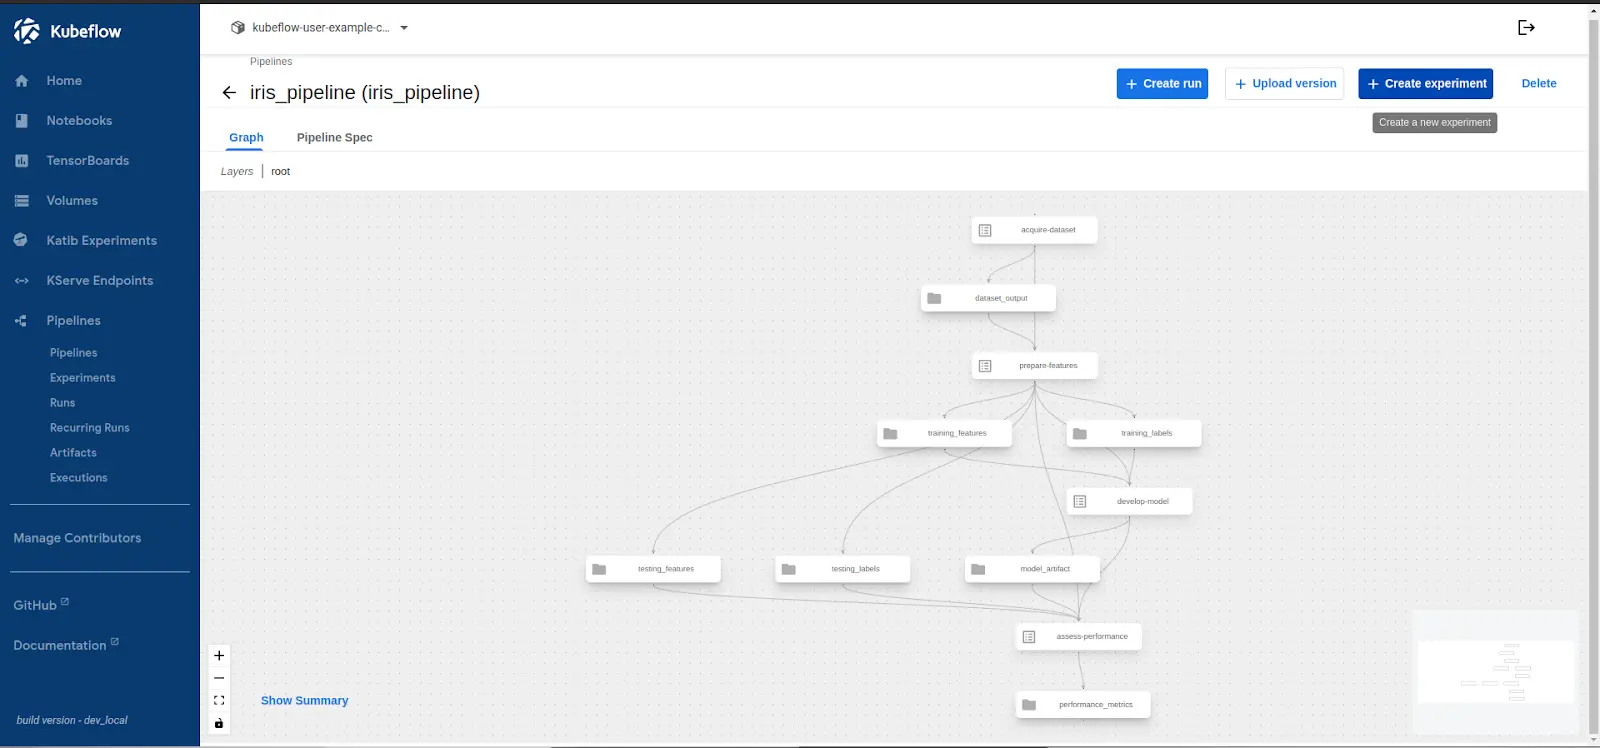
The pipeline used in this demo is designed for Iris Classification, a widely used dataset in ML research. The goal is to classify iris flowers into three species—Setosa, Versicolor, and Virginica—based on their sepal and petal dimensions. The pipeline follows these key steps:
- Data Acquisition: Load the Iris dataset and store it in an accessible format.
- Feature Preparation: Normalize features and split the data into training and testing sets.
- Model Development: Train a classification model using Scikit-learn.
- Performance Assessment: Evaluate the trained model and store accuracy metrics.
- Pipeline Compilation & Execution: Define the pipeline in Kubeflow, generate the required YAML configuration, and execute the workflow.
Project structure
To keep the workflow modular and maintainable, the pipeline is organized into separate components, each handling a specific part of the process. Below is the structure of the repository:
kubeflow-ml-pipeline/
│── components/
│   ├── data_acquisition.py          # Loads the dataset
│   ├── feature_preparation.py       # Prepares features for training
│   ├── model_development.py         # Trains the ML model
│   ├── performance_assessment.py    # Evaluates model performance
│── pipeline.py                      # Defines and assembles the pipeline
│── iris_pipeline.yaml               # Compiled pipeline YAML for execution
│── requirements.txt                 # Python dependencies
│── README.md                        # Documentation
Each Python file in the components/ directory corresponds to a step in the ML pipeline. These components are defined as Kubeflow pipeline tasks, ensuring that each stage runs independently while passing necessary data to the next step.
Cloning the repository
To deploy this pipeline, first clone the GitHub repository containing the prebuilt Kubeflow pipeline components:
$ git clone https://github.com/infracloudio/kubeflow-blog
$ cd kubeflow-ml-pipeline
Install the required Python dependencies:
pip install -r requirements.txt
Generating the pipeline YAML
The pipeline is defined in pipeline.py, which orchestrates all the steps. To compile the pipeline into a format that Kubeflow can execute, run:
This generates a pipeline specification file (iris_pipeline.yaml), which serves as an input to Kubeflow Pipelines. The file defines all pipeline components, dependencies, and execution configurations.
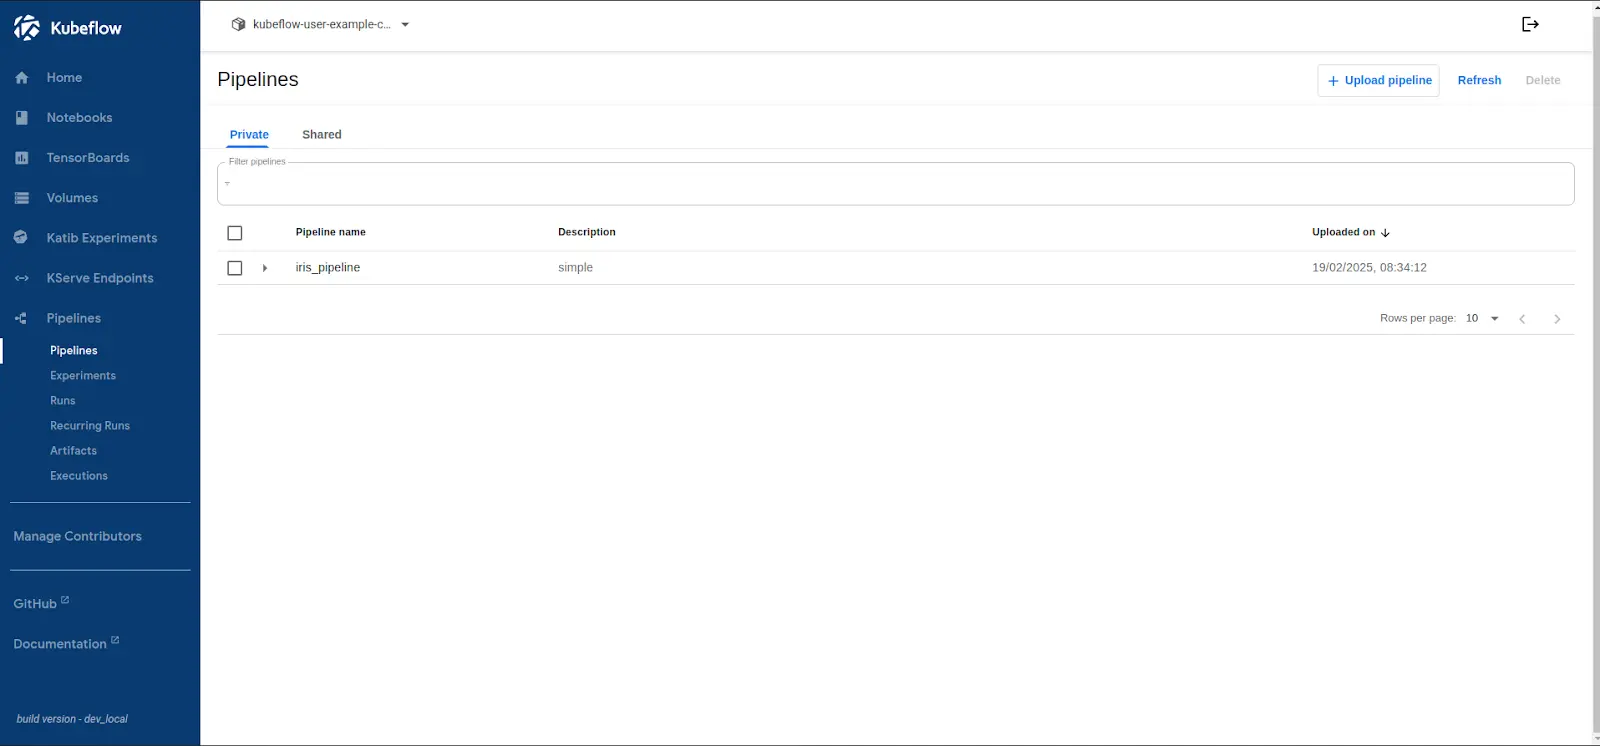
Uploading and running the pipeline
Once the pipeline YAML is generated, upload it to the Kubeflow Pipelines UI:
-
Open the Kubeflow UI (http://
) and navigate to the Pipelines section. 
-
Click Upload Pipeline → Upload a file and select iris_pipeline.yaml.
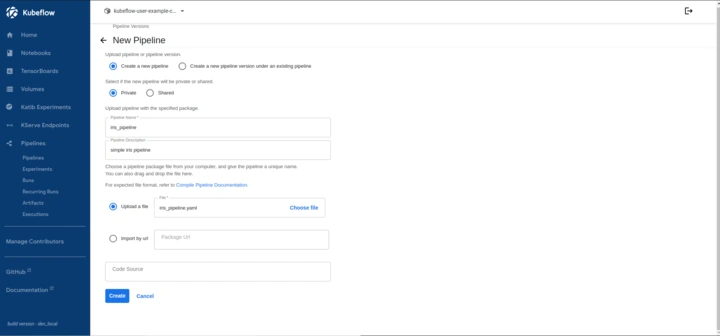
-
Provide a pipeline name and click Create.
-
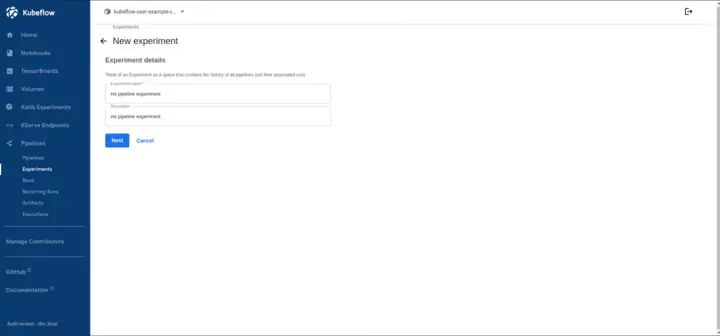
Once the pipeline appears in the UI, click Create Experiment and define the name of the experiment.
Kubeflow Pipelines organize runs under Experiments, allowing versioning, comparison, and tracking of multiple executions. In this step, we create an experiment, and later run the pipeline.
-
Select the uploaded pipeline and start a new run.
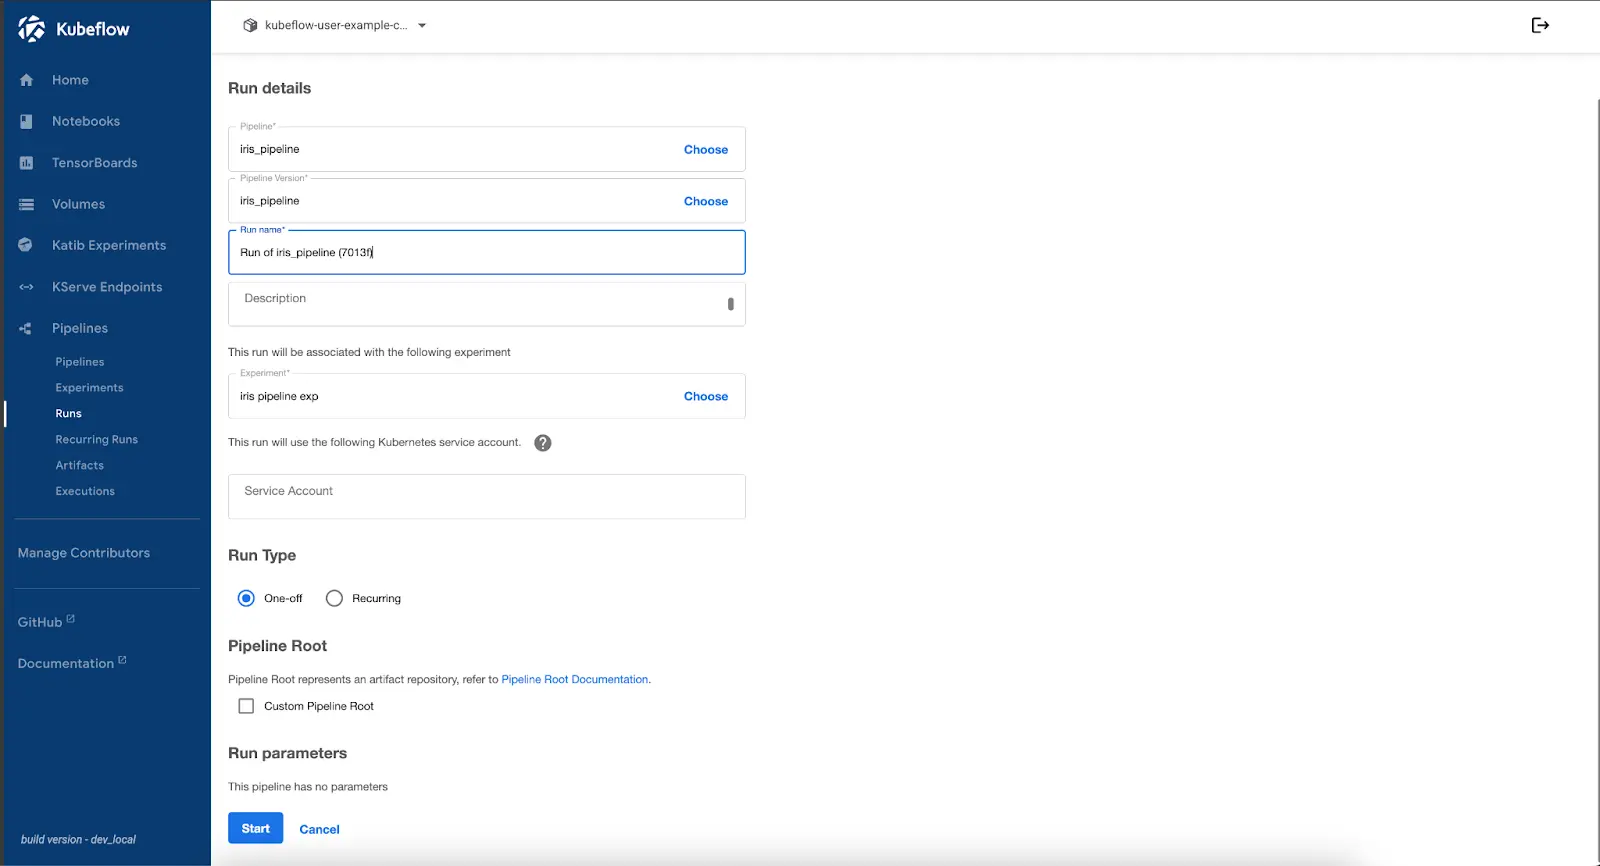
Kubeflow will now execute the pipeline, running each component sequentially. The UI provides a real-time view of the execution status, logs, and artifacts generated during each step.
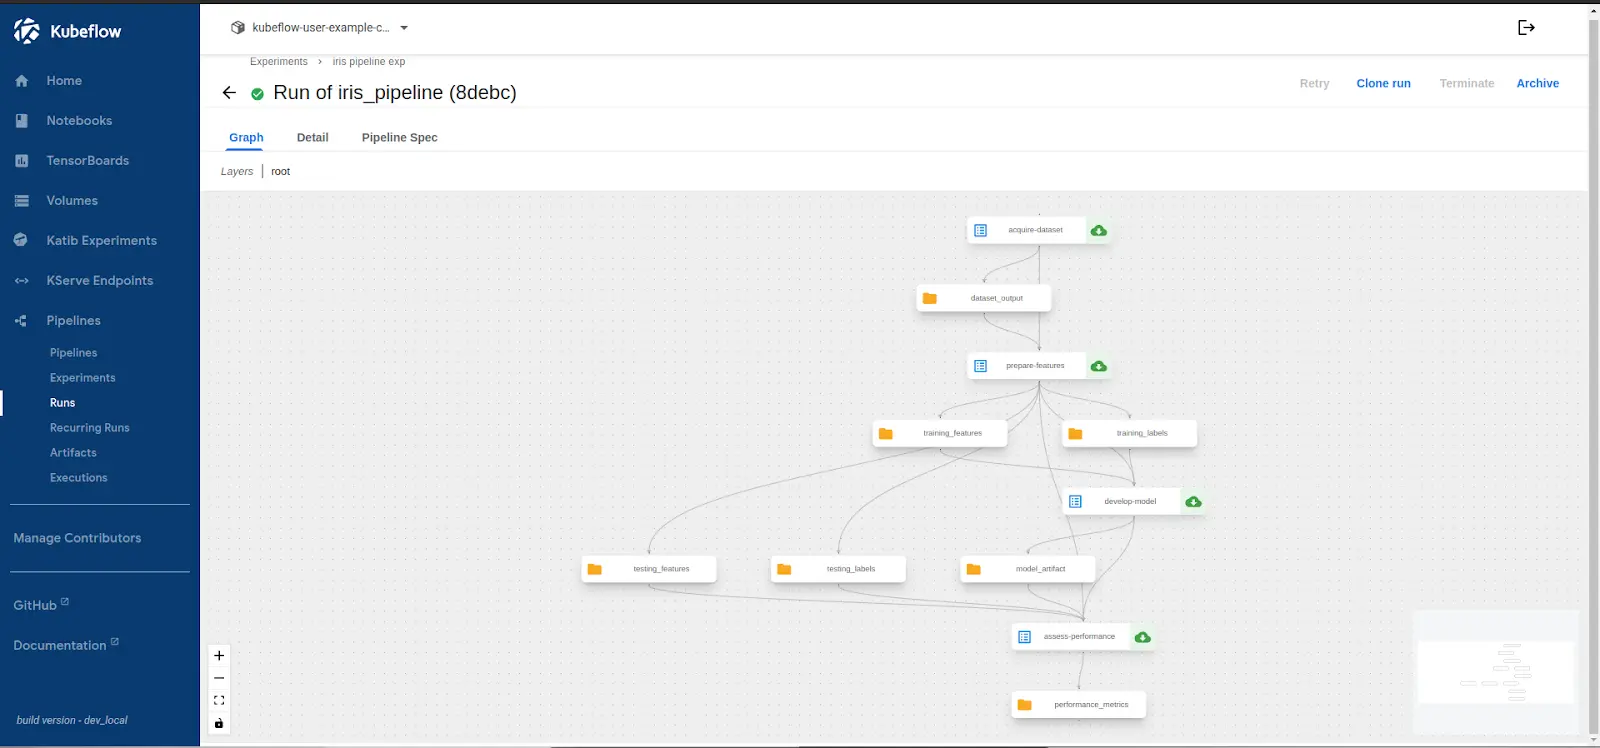
Verifying the pipeline execution
After execution, verify that the pipeline produced the expected results:
- Check Pipeline Runs → Navigate to the Runs section in the UI to view completed executions.
- Inspect Logs → Click on individual pipeline steps to examine logs for potential errors.
- Check Artifacts → Review generated artifacts, such as trained models and evaluation metrics, in the tab or Minio.
If any step fails, debugging can be done using kubectl logs to inspect errors in individual pipeline components.
Verifying stored artifacts in MinIO
Kubeflow stores artifacts such as trained models, evaluation metrics, and logs in MinIO, which acts as an S3-compatible object store. To confirm the pipeline outputs are saved:
-
Check MinIO Storage
Retrieve the MinIO pod name:
$ kubectl get pods -n kubeflow -l app=minio NAME READY STATUS RESTARTS AGE minio-59b68688b5-kzsfb 2/2 Running 0 8h -
Exec into the MinIO pod and list the stored artifacts
$ kubectl exec -it-n kubeflow -- ls -lh /data/mlpipeline/artifacts drwxr-xr-x 3 root root 4.0K Feb 27 07:37 iris-pipeline-4rbkj drwxr-xr-x 3 root root 4.0K Feb 27 11:15 iris-pipeline-4sq9g drwxr-xr-x 3 root root 4.0K Feb 28 02:16 iris-pipeline-88mvl -
Inspecting the Model Output
Inspect the contents of a specific pipeline run directory:
$ ls -lh /data/mlpipeline/artifacts/-rw-r--r-- 1 root root 12.5K Feb 27 07:37 model.joblib -rw-r--r-- 1 root root 1.2K Feb 27 07:37 metrics.txt -
Check model accuracy:
cat /data/mlpipeline/artifacts//metrics.txt Expected output:
This confirms that artifacts from different pipeline runs are correctly stored.
If the model or evaluation file is missing, re-run the pipeline and ensure that the model training step has completed successfully.
Now that the pipeline has stored the trained model and evaluation metrics, the next step is to put these artifacts to use. The model can be deployed for inference using KFServing or a simple API like FastAPI. It can also power an AI assistant that learns from new data.
Conclusion
Deploying Kubeflow on GKE provides a scalable foundation for machine learning workflows, but it also presents challenges such as authentication errors, resource limits, and version mismatches. This guide addresses these issues while demonstrating how to build and run an ML pipeline. By optimizing configurations, leveraging debugging techniques, and structuring AI workflows efficiently, teams can enhance performance and reliability.
Kubeflow streamlines MLOps by automating pipeline execution and resource management, making it easier to scale AI models. Beyond the basics, advanced use cases include distributed training, model versioning, and real-time inference. To further refine deployments, refer to the Kubeflow Official Documentation, GKE Cluster Setup Guide, and Kubeflow Troubleshooting Guide. While learning this will help you build an AI pipeline, running it in production can introduce unexpected challenges. If you hit a roadblock, reach out to InfraCloud experts for seamless AI cloud services.
I hope you found this guide insightful. If you’d like to discuss MLOps and Kubernetes further, feel free to connect with me on LinkedIn.
Source link
[Disclaimer]
pcachary.in aggregates news from various RSS feeds. We are not responsible for the accuracy or completeness of third-party content.
.jpg?w=100&resize=100,70&ssl=1 "Dolce la Hulpe – A forest retreat so close to Brussels! | My Travelogue")


 Act, 1946")


